Monday, July 29, 2019

#Storytelling Story Telling VS. Writing A Story – Part 1: Story Telling


Me telling a story. This was about three weeks before I retired from full-time high school teaching. It's after school. I'm in a science lab with a posted occupancy of 87. There are over 120 students, teachers, staff, and administrators attending the 90-minute "Story Time with Uncle Chuck."
I’ve been a storyteller all my life. As a kid, during summer vacations in Ft. Wayne, Indiana, I would gather my cousins around under the weeping willow tree in my grandmother’s front yard. I would regale them with my interpretations of Bill Cosby and Bob Newhart comedy routines.

As a children’s Sunday School and Junior Church leader, and even to adult audiences at more than one church gathering, I spun my versions of Bible Stories. Did you know that Gideon had a pair of Nike shoes ready just in case the battle against the Midianites didn’t go his way?

When I started teaching, stories became a vehicle to convey the meaning of science concepts to students in an often more comprehensible manner than reading, writing or lecturing.


Video of a story I told in class, click the link to see and hear the story
"The time I tore my quadriceps muscle."


  1. One of the most important aspects of oral storytelling is to read the audience and react to keep them focused on the story. All good public speakers do this. For me, it was a natural thing. I can sense when I’m losing a crowd and am almost always able to make adjustments on the fly to bring them back to my narrative.
  2. Also, when telling a story, good storytellers use dramatic pauses to give the listeners a chance to formulate a picture in their minds. 
  3. Different voices for different characters add another dimension to the oration. 
  4. Shouting, whispering, peering from side to side, using a shocked look—or smug or chagrined or embarrassed, among others—can bring a feeling or picture into the mind of the listeners. See the photo above for an example.
  5. I’ve even said, “Now, about this time, I’m thinking…” to get listeners to visualize what I see going on as I’m telling the story.
Example. of #5.
  • I tell a story about deer hunting and a mule. I heard it first at a coaching clinic. I've heard it told in 10 minutes. My version last 30+ minutes. 
  • At one point in the story, my friend and I are deer hunting at his request. I have no desire to deer hunt. I'm on this trip to keep him from ever inviting me again.
  • He assigns me a necessary task he does not want to do. Even though I don't want to do it, either, I agree--remember, I never want to be invited to deer hunt again.
  • While performing the task, I end up with a sprained ankle and torn trousers. When I get back to his Toyota Land Cruiser, he's asleep.
  • My next spoken line to my audience is,

“Now, about this time, I’m thinking…”

  • By explaining my thinking, listeners form ideas in their minds of my next action. And, the listen to the story to see if they are correct.
  • BTW. No one ever figures out what I'm going to do from this clue, and the ending ALWAYS elicits expressions from shock to anger to hilarity.

Unfortunately, when you write a story you can’t do any of the things I’ve listed that you can when you tell a story. Except the #3 point above…

But more on that next week in Story Telling VS. Writing A Story – Part 2: Writing a Story

SEO: nostalgia, Americana, memories, storytelling, humor

Follow me on 
Twitter: @CRDowningAuthor 
My website is: www.crdowning.com
Other Blogs.
I'd appreciate your feedback on Blogger!


Tuesday, July 23, 2019

#Nostalgia. I know John Glenn did not walk on the moon.

I watched this event in my Pastor's home. He had the biggest television screen of anyone we knew. It's hard to describe the feeling of seeing and hearing humans set foot on the moon's surface and return to Earth. If you're under the age of 55, I recommend you find the broadcast online and watch it. Understand, you know more now about "space travel" than just about anyone did in 1969. This is the link to CBS's anniversary tribute.


I know John Glenn did not walk on the moon. Read on anyway.

The first American to orbit the earth and return safely was John Glenn on February 20, 1962. A mere seven years later, humans walked on the surface of the moon.

My twelfth birthday was February 20, 1962. On that morning, John Glenn blasted off from Cape Canaveral in a tiny Mercury space capsule. As far as I know, my birthdate and Glenn's orbital mission are all I have in common with the astronaut. 

His mission was to be the first American to orbit the earth. The photograph below shows Glenn standing beside his wife and Friendship 7 in 2002. You can see the size of the capsule—just big enough for one astronaut and the electronics to keep him up. And hopefully bring him down safely.


Notice in the diagram of the capsule that its technical name included the term ballistic. In reality, Glenn’s spacecraft sat atop at huge missile—really a metal tube filled with explosive fuel—so the ballistic descriptor was more accurate than anyone really wanted to admit.


The sum total of the computing power of Friendship 7 was, using a generous term, small. By today’s standards, microscopic would be more appropriate. The majority of the computing during the slightly less than 5-hour flight was done at Goddard Space Center in Maryland. The amount of technology actually available to Glenn was far less than a 2015 smartphone. Or as one comment made to celebrate the 50th anniversary of the flight reads:

It's amazing to think that the tiny laptop that I'm posting this from has hundreds of times the computing power than was involved in the whole Friendship project.

I remember sitting a watching the lift off. We were mesmerized. We watched the splashdown on television at school.

Splashdown. That’s what they called all the Mercury and Apollo landings. The small crafts crashed into the ocean. There were parachutes that slowed the descent somewhat, but the astronauts splashed into the sea. Inflatable bags—labeled RECOVERY AIDS in the diagram—deployed and a beacon began transmitting.

Over a dozen Navy vessels were in the general area of the planned splashdown. At least one had to arrive before the minimal flotation system failed and the capsule—most probably with the astronaut inside—would sink into the briny deep.

According to the New York Daily News the day after the event:

But the astronaut, who had maintained part-manual control of the space capsule for the last two orbits, dropped gently to a safe parachute landing in the Atlantic 800 miles southeast of this launch site.
Remaining inside the capsule, Glenn was swiftly picked up by the destroyer Noa, a recovery ship on station a scant six miles from the spot where the spacecraft touched down at 2:43 P.M.

Wikipedia portrays a slightly more time-distant perspective.
According to a chart printed in the NASA publication Results of the First United States Manned Orbital Space Flight, Feb. 20, 1962, the spacecraft splashed down in the Atlantic at coordinates near 21°20′N 68°40′W, 40 miles (60 km) short of the planned landing zone. Retrofire calculations had not taken into account spacecraft weight loss due to use of onboard consumables. The USS Noa, a destroyer code-named Steelhead, had spotted the spacecraft when it was descending on its parachute. The destroyer was about six miles (10 km) away when it radioed Glenn that it would reach him shortly. The Noa came alongside Friendship 7 seventeen minutes later.

What the USA had shown was the ability to put a man in orbit and bring him back alive. We were all sure that America would easily meet President Kennedy’s ten-year timeline to reach the surface of the moon.

I was the proudest kid at Spring Valley Elementary School that day! It all happened on my birthday.

And we reached the moon before the end of JFK's timeline.

John Glenn died in December of 2016. USA Today report.

If you did not see the movie Hidden Figures in theaters, I recommend you rent, stream, or whaterver you need to do to see that movie


SEO: nostalgia, Americana, memories, 1960s, space, NASA
.
Follow me on 
Twitter: @CRDowningAuthor 
My website is: www.crdowning.com

I'd appreciate your feedback on Blogger!

Tuesday, July 16, 2019

#Nostalgia Duncan Yo-yos and Yo-yo Masters

Here's the link to a short video of "The King's Yomen." It's pretty cool stuff. 
https://yoyotricks.com/yoyo-videos/yoyo-shows/the-kings-yomen-promotional-video-2012/3436/

The Wienermobile was the highlight of the events in our neighborhood in the late 1950s and early 1960s. The second-place event was the visit of the Duncan Yo-yo Masters at the drug store at the end of our street. I’ve recently discovered that the official title for those people was “Yo-yo Demonstrator.” I like Yo-yo Master better, so I’m sticking with it.

An Aside
My family moved to Spring Valley in 1957. From then, until 1971, when I married Leanne Stagner, I lived at 4166 Citradora Drive in Spring Valley, California. Citradora begins at Campo Road and ends about ½ mile North-ish at Camino Paz.

When I was growing up, a drug store/doctor’s office was on the East side of Citradora and a gas station was on the West side of Citradora where it met Campo. Doctors Webster and Contasti were the owners/occupants of the doctor’s office end of that building. I spent many Saturday mornings there following Friday night football game injuries. I spent many other hours in that doctor’s office, too. When I stopped going to Dr. Webster because he wasn’t on the health insurance plan I had, he showed me two file folders. It took a pair of folders, each over 2-inches thick to hold my records.

The drug store, Valley Pharmacy by name, end of the building wouldn’t have the same sign on its roof today as it did back then. The word DRUGS, stood tall and proud in four-foot-tall letters. 


Ah, the innocence of that time…

And now, back to our regularly scheduled programming.

I don’t know how often the Yo-yo Masters visited the Valley Pharmacy. I do remember what they did.

 Unless we had money to buy a yo-yo or brought one with us, they gave us all a yo-yo to practice with. This was a masterful marketing ploy. I suspect that Valley Pharmacy sold more yo-yos the weeks of those visits than all the weeks the rest of the year combined.

The masters began by showing everyone how to make the yo-yo go down and back up. That sounds like a dumb thing for them to show, but I’ve learned that it’s harder for some people than others to do.

You need to know that real yo-yo strings are really one big loop that’s been twisted into a single strand. Hold that thought.

Once we were all yo-yoing, they worked on what I called the waterfall technique. That began by holding the yo-yo in your hand with the palm down. Next, you rotated your wrist and tossed the yo-yo off the ends of your fingers. You cradled the yo-yo as it returned to your hand as it returned up to it. Without stopping the movement of the yo-yo, you rotated your wrist and tossed the yo-yo. Poetry in motion.

  • The first trick the masters tried to teach us was the sleeper. After waterfalling your yo-yo, if you jerked your hand upward at the moment the yo-yo was motionless at the bottom of its downward flight, you might get it to spin without rewinding the string. That’s possible because the string is really a big loop. Remember that thought you were holding? I was a quasi-master of putting my yo-yo to sleep. In other words, I could get the yo-yo to sleep about half the times I tried. 
  • The next trick up the difficulty ladder was walking the dog. For this trick, after the yo-yo was asleep, you lowered it gently to the ground. When the spinning yo-yo made contact with the ground, it would creep forward, much like a dog on a leash. I was a non-master of that trick. In fact, I never recall a time when I got my yo-yo dog to walk more than an inch before it climbed back up into the palm of my hand.
  • Other trick demonstrations followed. I watched while some of my friends did feats of wonder as they copied the Yo-yo Masters. I resurrected some bad memories for this blog post by searching for yo-yo tricks. This link https://yoyotricks.com/yoyo-tricks/ starts with videos of the basics and goes insane by the end of the Basics video.


I told you that Valley Pharmacy sold many yo-yos during and immediately following the Yo-yo Masters’ visit. The cheapest yo-yo you could buy back then was made of wood. I don’t remember if it was a Duncan, but it probably was. The coveted yo-yo of choice was not a wooden yo-yo. It was the colorful, plastic Duncan Imperial.


I had one of those. 
At least I looked like a good yo-yoer.

SEO: nostalgia, Americana, memories, 1950s, 1960s, family

Follow me on 
Twitter: @CRDowningAuthor (rarely)

My website is: www.crdowning.com

My Blogs
Life as I see itTopics rotate between those of general interest to lovers of life,  authors, teachers—probably you, too.  Posts on Tuesdays and some Mondays.  http://crdowning-author.blogspot.com/?alt=rss

My Christian Context. Posts M/W of discussion questions. Thursdays - Timeless Truths. Fridays - Expressions of Faith. https://mychristiancontext.blogspot.com/  

I appreciate your feedback on Blogger!


Saturday, July 13, 2019

#Teaching Tip #3 - More on (not moron!) Homework

This is the third of a series of 10 posts.

All 10 posts ran on consecutive weeks.

As of Labor Day, 2018, all ten of these #Teaching Tip posts are searchable on my blog.

If you're not a teacher and you're reading this,
let a teacher know.
I've been in enough "inservice" sessions to guarantee that the information in this series is better than most they'll be sitting through this school year. 


What happens when you teach an advanced course—AP or IB, for example? No matter what “level” your course is, if you include higher level thinking skills in assignments, how do you grade that in class?

There are times when the only appropriate way to grade an assignment is for the teacher—you—to grade the whole kit and caboodle. That doesn’t have to be very often.

I’ll present two examples of how you can use PowerPoint to make your life easier. I have used the first example, scientific graphing, in all my classes from 9th-12th grade.

The second example is from AP Biology. It will be part of next week's blog.

The good news is this: You don’t have to know much about science to appreciate the explanation of this grading technique. The model works in any content area where you have repeating assignment types—graphing, in example one—or complex assignments with high-level vocabulary—example two.

When you grade an assignment of a type that is frequently assigned, you should teach how to do that assignment early in the year. Teaching the process, allowing students to make a sample, and grading that sample is the best way to ensure consistent grading over time.

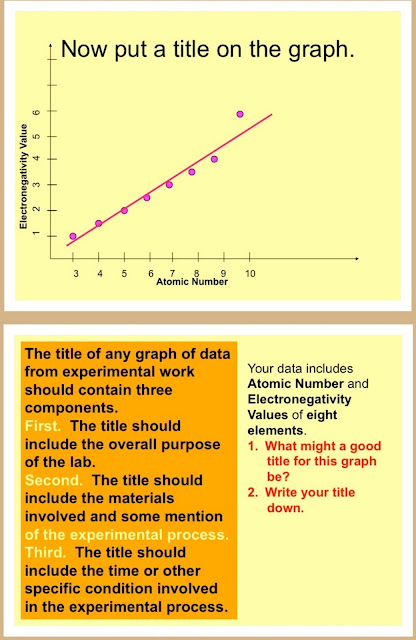
The images below are from the PowerPoint used to teach scientific graphing.


During instruction, the top slide in the next set of PowerPoint slides starts with a blank X-Y axis. Labels and other components appear at the proper locations, reinforcing the previous slides’ information.

Using an appropriate scale is emphasized. Pretty much the goal is to fill a piece of graph paper with the graph. Next producing the line that "is" the graph is described.

Most students think their graphs are "done" at this point. They are not!
The title on a scientific graph is very important. It is worth one-third of the points for the graph. For that reason, an explanation of how to name a graph and why is critical, especially since graphs are often graded in class.


I apologize for the overlap of print in some images. That's because various items "appear" with a mouse click at specific times in the presentation.

Look at the image titled “Now put a title on the graph” in the pair above. The first text box to appear after the explanation of what information a title contains is, “The title should explain what you have graphed.”

Students discuss ideas for titles in pairs.

“For example: This title would be…” appears.

Last the actual title “Electronegativity Values of Selected Elements” appears in the proper location and the two previously visible text boxes disappear. This leads to the final slide.
If a graph has multiple lines, a key is needed. 
Students then are given time to make a graph and share it with their partners. They "grade" their graphs as practice.

After the first lab activity, students grade their own graphs.

They use the “grading pens” I mentioned in a previous blog for this grading. No pens or pencils except the grading pens are allowed during the grading.


During the grading time, slides appear in left to right, top row to bottom row.

Grading begins with the title.

The gray box containing the title appears after students have compared what they had on their graphs.
Students ask clarifying questions during the time the left slide in the bottom row is visible.

The last slide comes into view.

  • Each “burst” appears in this sequence. Title. Y-axis. X-axis. Curve. Key. Yellow box.
  • Students put the points earned in the same place on their graph as the “burst” for that feature appears on the screen.
  • Questions are addressed. The teacher is the final arbitrator in any dispute.
  • Points are totaled and written under the student's name on the graph.
  • On “random” assignments, graphs are exchanged after grading. Scoring in authenticated by the new grader. Differences in scoring are resolved by the teacher before the papers are turned in. Not knowing when this will occur helps ensure honesty in the scoring.
  • I check a set of graphs periodically, too. Again, this encourages the students to be honest in their assessments of point values.

This method does “take class time.” However, students learn from their errors while the teacher saves grading time for more complex assignments.

In the next blog in this series, I explain my method for peer grading of assignments with specific details required or that are based on “advanced” material.


Email me: EIT.DrD@gmail.com with questions/ comments.
Or, if you'd like more information or samples of anything described in this series, send an email there!

SEO: Teaching, teachers, grading, homework, reading assignments


Follow me on 
Twitter: @CRDowningAuthor 
My website is: www.crdowning.com

I'd appreciate your feedback!